How to Install Boost C++ Library and Run CI/CD Workflow with Docker Container
“Docker is an open platform for developing, shipping, and running applications… A continer is a sandboxed process on our machine that is isolated from all other porcesses on the host machine….”
Introduction
Docker has worked to make the capabilities of kernal namespaces and cgroups, features approachable and easy to use. Because it can be run on local machines, virtual machines or deployed to the cloud, and also builds an image which is based on the ubuntu image, but installs the Apache web server and our program or application, as well as the configuration details needed to make the program or application run.
In this post, I would like to go through how to create a container image with custom filesystem and boost c++ library shortly. In addition, running simple examples using Boost.Regex in docker container, and setting up on continuous integration (CI) with docker.
Docker Overview

Docker uses a client-server architecture. The Docker client talks to the Docker daemon, which does the heavy lifting of building, running, and distributing your Docker containers. The Docker client and daemon can run on the same system, or we can connect a Docker client to a remote Docker daemon. The Docker client and daemon communicate using a REST API, over UNIX sockets or a network interface. Another Docker client is Docker Compose, that lets we work with applications consisting of a set of containers.
In order to build the container images, we can use certified DOCKER OFFICIAL IMAGE from Docker Hub or some third-party repositories. For example, we would use the base Ubuntu 16.04 image and build the image locally with following command.
$ docker build -f Dockerfile -t ubuntu16.04:xenial
Sometimes, we want to check all the images created on the local machine by following command.
REPOSITORY              TAG                 IMAGE ID
ubuntu16.04             latest              025cee1ce57d
ubuntu16.04             xenial              025cee1ce57d
...
Build Docker Image with Boost Library
We will use the other method to build the Ubuntu 16.04 LTS (Xenial Xerus) image for Boost C++ libraries. The relevant Dockerfile and the Boost-CMake C++ examples are available on GitHub Gist. We can build the following Dockerfile on x86-64 platform.
1 | FROM ubuntu:16.04 |
To build the Boost Docker image locally, we can run the following command. In this case, we will build Boost C++ library 1.80.0.
$ BOOST_VERSION=1.80.0
$ NUM_JOBS=4
$ docker build . --build-arg BOOST_VERSION=${BOOST_VERSION} --build-arg NUM_JOBS=${NUM_JOBS} --tag=louissrliu/boost:${BOOST_VERSION}
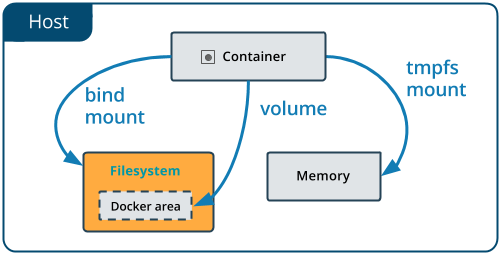
After we build Docker images from above Dockerfile, we can also mount a file or directory on the local machine into a container. The file or directory is referenced by its absolute path on the local (host) machine. By contrast, when we use a volume, a new directory is created within Docker’s storage directory on the local (host) machine, and Docker manages that directory’s contents.
We can run the following command to specify the image, mount the directory, allocate a tty for the container process and interactive processes with the Docker container.
$ docker run -it -v $(pwd)/examples:/mnt louissrliu/boost:${BOOST_VERSION} bash
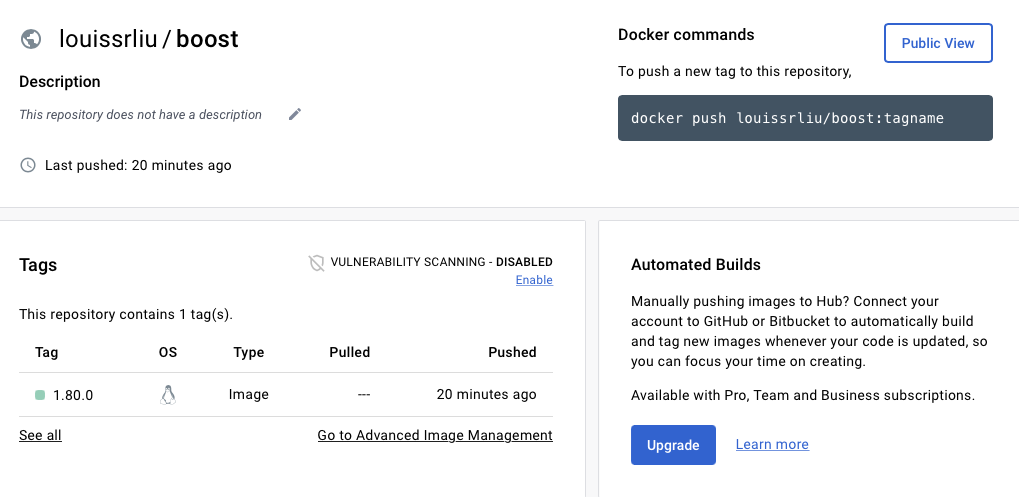
In addition, we can push/pull the above to a registry with following commands.
$ docker push louissrliu/boost:${BOOST_VERSION}
$ docker pull louissrliu/boost:${BOOST_VERSION}
Boost Examples
To show that the Boost C++ library we have built works inside the Docker container, we will build and run a example using Boost.Regex, and another C++ example in docker container, available on Boost-Docker repo, while allocating a tty for the container process and interactive processes. We we can run the following commands.
$ cmake -B build
$ cmake --build build --config Release --parallel
Then, executting these two examples, which simply print log outputs as shown below
$ # extractemail example
$ ./build/extractemail/ExtractEmail  < extractemail/data/tangled.txt
German fairy tale

$ # arraynexting example
$ echo 1 2 3 4 |  ./build/arraynexting/ArrayNexting
The longest length of a set s[k] = {nums[k], nums[nums[k]], nums[nums[nums[k]]], ... } is : 1
Continuous Integration/Continuous Delivery (CI/CD) Workflow with Docker
Continuous integration (CI) is the part of the developement procee where we’re looking to get our code changes merged with the main branch of this boost docker build. GitHub Actions allows us to automate our build, test, and deployment pipeline. Here we create the following yaml file and placed it in Boost-Docker repo to get started using Docker for building this image in CI.
1 | name: Docker Image CI |
Reference
- Docker docs
- Boost C++ library
- Introduction to GitHub Actions
- Continuous integration with Docker
- Publishing Docker Images
Thanks for reading! Feel free to leave the comments below or email to me. Any pieces of advice or discussions are always welcome. :)
